- Home Row, Left Hand
- Home Row, Right Hand
- Home Row, Left + Right
- Home Row, Extended Index Fingers
- The Shift Keys
- Quotes and Apostrophe
- Home Row: The Whole Shebang
- Top Row Left: QWERT
- Top Row Right: YUIOP
- It's Lonely at the Top: All Top Row Letters
- Row by Row: Top & Home Rows Combined
- Bottom Row Right: NM,./?
- Bottom Row Left: ZXCVB
- Putting It All Together: Bottom Row
- Letters Consolidation
- Take a Break!
- The Brackets
- Numbers Row Left: 12345
- Numbers Row Right: 67890
- Putting It All Together: Numbers
- Numbers Row Left + Shift: !@#$%
- Numbers Row Right + Shift: ^&*()
- Math Keys: -=_+
- Programming Keys: ~`|\
- Putting It All Together: Special Characters
- Numbers Row + Special Characters
- The Last Connection
- The Backspace/Delete Key
- Final Exam
- Graduation
- Where to Go From Here
Lesson 1: Home Row, Left Hand
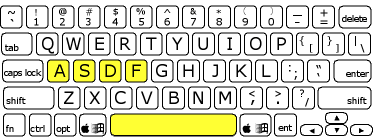
Welcome to Lesson 1! First, a little orientation: at the top of every lesson you'll see a diagram of the keyboard that highlights in yellow the keys you will be working on. In subsequent keyboarding lessons the keys you have already learned but are not the focus of the lesson will be coloured green. It is vital that you will have mastered those keys before moving onto a new lesson. Mastery, for purposes of this course means that you can confidently and consistently type a lesson exercise in under 60 seconds with NO errors.
With that out of the way, here we go!
The home row is a key concept in typing (sorry for the pun!). It is that middle horizontal row of the keyboard that starts with A and goes all the way across. The idea behind the home row is that each finger remains in light contact with a particular key there when it is not typing in order to keep "grounded", providing a reference point for every other key. Here are the "home keys" for each of your 8 fingers:
| Finger | Key |
|---|---|
| Left hand pinky | A |
| Left hand ring | S |
| Left hand middle | D |
| Left hand index | F |
| Right hand index | J |
| Right hand middle | K |
| Right hand ring | L |
| Right hand pinky | ; |
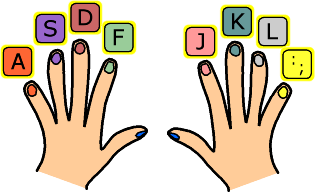
If you have a relatively recent keyboard, it more than likey has some sort of bump you can feel on the F and J keys, where your index fingers go. This is of course to help you quickly find the home row when you're not looking at the keyboard.
Place your fingers gently on their respective keys now, light enough so that you are not actually pressing them! This is where your fingers "hang out" when they're not typing, and where they "spring" back to just after they have finished typing another key somewhere else. It is very important for your fingers to be able to go to these keys at any time, at a split second's notice. Practice taking your hands away and placing them on these keys several times, until you can do it confidently, and without looking.
The space bar is pressed with either thumb. Most people probably use only one thumb, the one on their dominant hand. The thumbs basically float comfortably in the air when not in use.
Below is your first interactive exercise based on the four left-hand home keys: ASDF. These are typed with the left-hand pinky, ring finger, middle finger and index finger respectively. Before typing even a single letter, please keep ALL of the Principles for Effective Learning in mind. Here are the instructions; all the exercises in all the lessons work this way, so read carefully:
- Press the "Click here to start" button, then type what you see on the screen. If you type correctly, the letter will turn to grey. If you err, it won't, and you will hear an error sound.
- To do the same again (which you should do if you make ANY mistakes), press the "Go again!" button that appears when you finish.
- Remember, shoot for no errors!! That is the most important thing right now. Speed means nothing; certainty and correctness are what's important.
- For practical purposes, you can consider yourself having mastered an exercise only if you are able to type three reloaded screens of exercises in a row in under 60 seconds each, with no errors, confidently.
Take a moment to tap your left hand fingers on your desk/table/thigh while saying the letters they will be typing (a, s, d, f), as in the above diagram. Do it forwards & backwards, and inside-out!
Sorry for the nonsense words to come, but there's only so much you can do with only 4 letters and the space bar! Make sure you are going slow enough to prevent mistakes. Be sure of every key; do not guess. And of course, don't look at the keyboard!
new! If you're feeling brave, you can also try the musical typing and speed typing variations of this lesson!
Click the orange button to begin the exercise, and start typing: